How to Add a Custom Font in Squarespace

Have you ever seen a website you love and they are using some kind of beautiful unique font that you can’t find on Squarespace itself?
I know I struggled with that when I was first learning how to build a website, and it was super frustrating to not know how to achieve the look I wanted.
If you’ve ever wondered how you can add your very own custom font on your website, I’m going to walk you through step-by-step so you can really stand out and make your site unique to you!
Best part about these codes is they will work for both Squarespace 7.0 AND 7.1!
Check out these examples below—gorgeous website designs from my portfolio—to show you how a custom font can completely personalize your website:

Beautiful modern Squarespace website designs from my portfolio
Excited yet? Here are the steps you will need to take:
PART 1: First, you will need to add a custom font file to your website. Here’s how:
Download the custom font file that you want to add to your website (this is a file with an extension of .ttf or .otf)
In your main Squarespace menu, click DESIGN -> CUSTOM CSS (at the bottom)
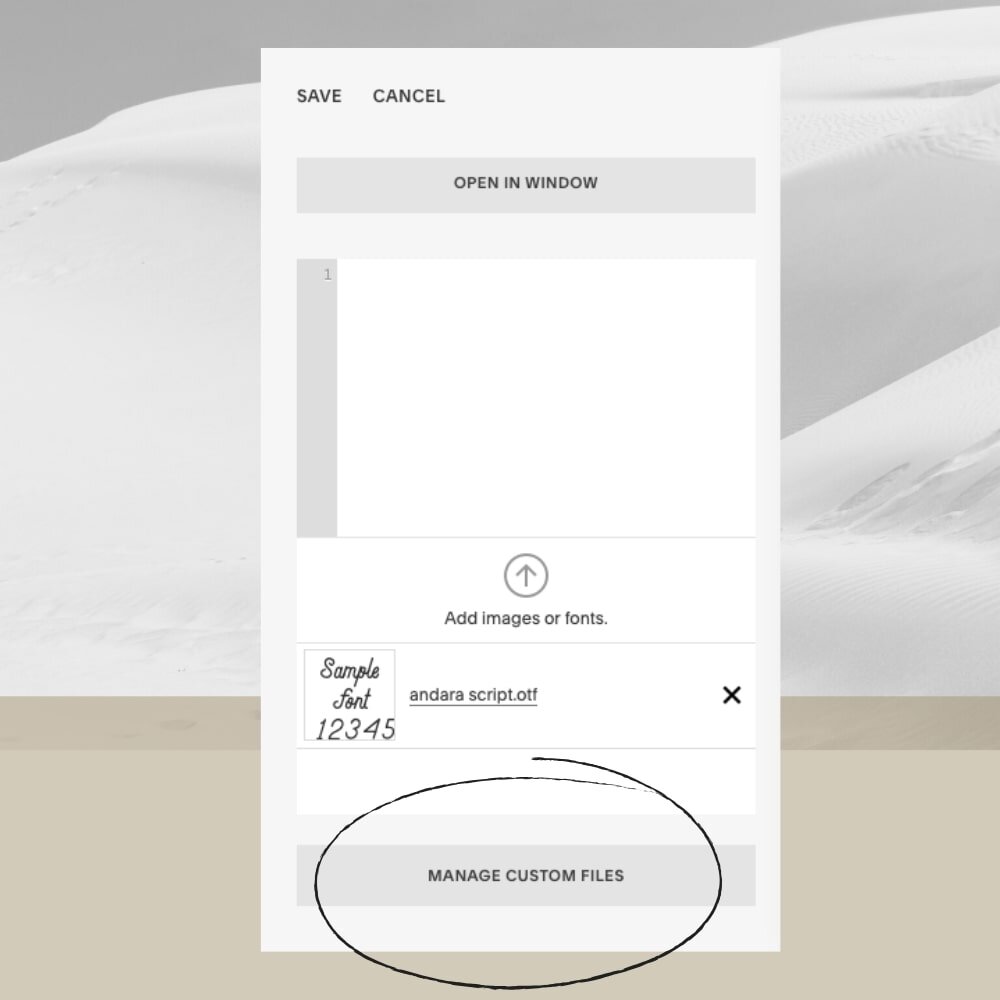
Below the CSS editor, click MANAGE CUSTOM FILES
Here, you will upload your newly downloaded font file. Having fast wireless business internet will make this faster — and less stressful — for you (or your team), but you should be able to upload even with standard speed internet.
Copy and paste the following code into the CSS editor:
@font-face {font-family: 'FONT NAME'; src: url('FONT URL');}
Now to customize it! Change the text that says FONT NAME to the name of your custom font.
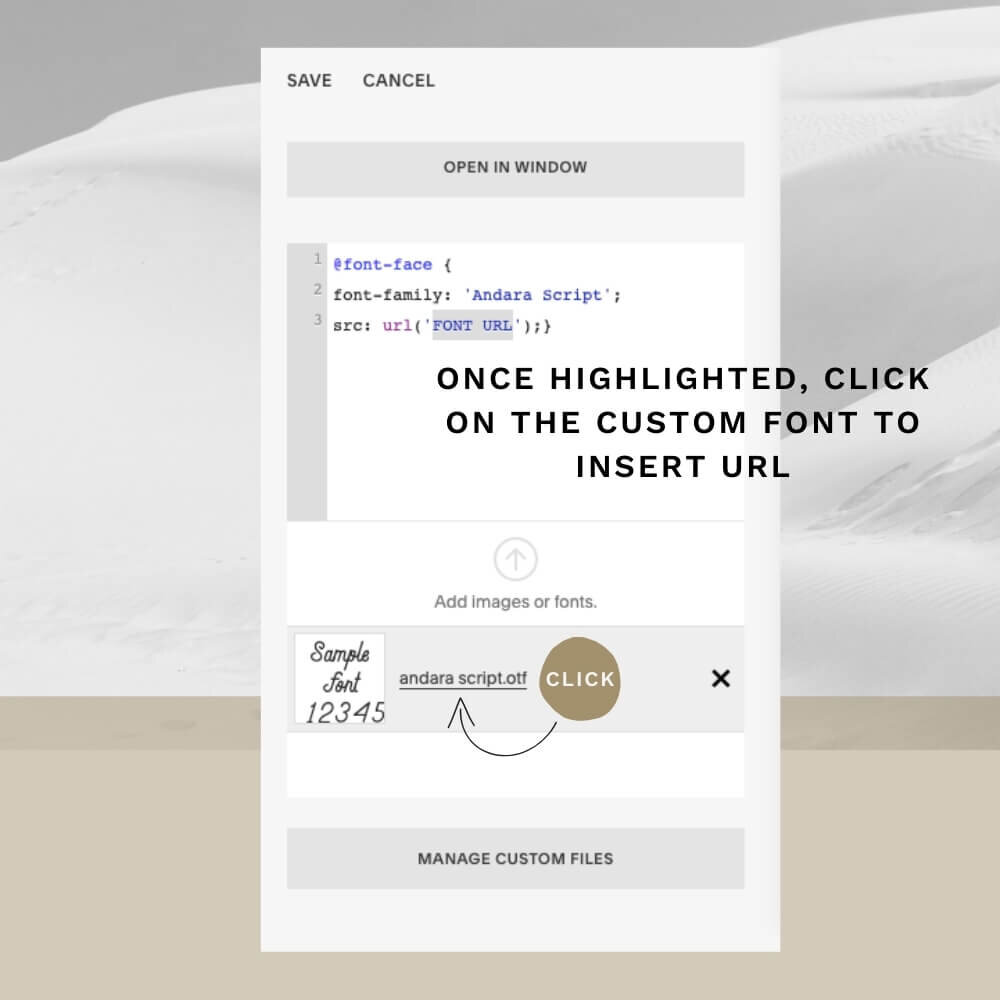
Highlight the text that says FONT URL.
Then click MANAGE CUSTOM FILES and click on the font you just uploaded in the previous steps. FONT URL should now be replaced with an actual Squarespace URL.
If you want to add another font, you’ll need to repeat this process for all of your custom fonts.
Before you move forward, I’d recommend FIRST making a test page on your website and write out sample text for each of your header fonts. That way, you will know exactly which fonts are being changed once you insert the below codes.
PART 2: Once you have all of your fonts uploaded and added to the CSS code, it's time to have them override your default Squarespace fonts.
Now to change your site’s fonts, copy and paste the code(s) below into the CSS editor, depending on what element you want to change:
/*to change heading 1 font*/
h1{ font-family: 'FONT NAME' !important;}/*to change heading 2 font*/
h2{font-family: 'FONT NAME' !important;}/*to change heading 3 font*/
h3{font-family: 'FONT NAME' !important;}/*to change heading 4 font*/
h4{font-family: 'FONT NAME' !important;}
For more advanced customization, let’s say you have a sentence that is in Heading 1 font but you just want to change one word into your custom script font for emphasis. You can create this effect by italicizing that word within the text block.
You can then use the code below which tells Squarespace that within a text block using Heading 1 font (or replace with h2 or h3 or h4, whatever your preference), change the italicized word(s) to script font:
/* Change italicized words in Heading 1 into script font */
h1 em {font-family: 'NAME OF YOUR SCRIPT FONT HERE' !important;}
Keep in mind that you can always adjust the settings of each font in the regular style editor if you want to make more adjustments (things like font size, font weight, letter spacing, etc.
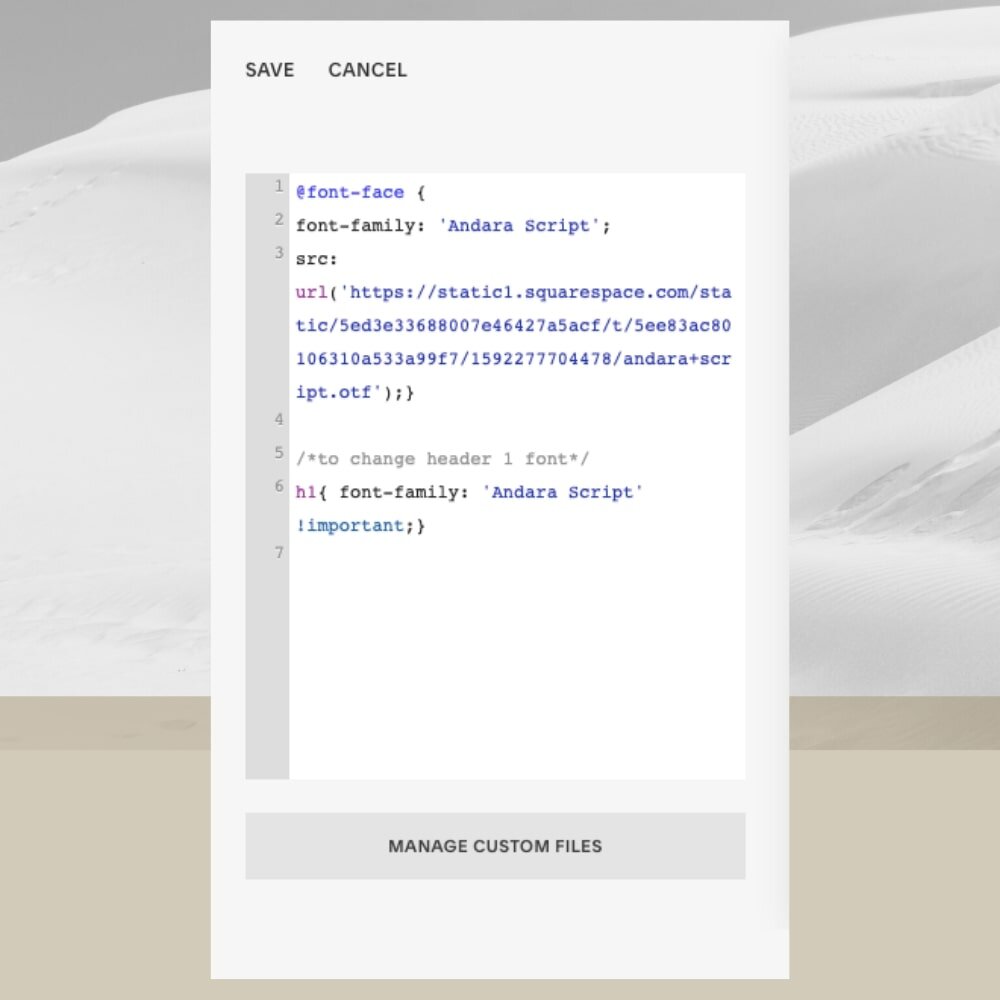
Important last step! Make sure to click SAVE at the top of the Custom CSS page. Here’s an example of how your final code should look at the end (if you only changed h1, let’s say):
There you go! Now you can enjoy your beautiful new custom fonts and a more unique website.
Now that you’ve got your custom fonts uploaded to your site, why not make your custom fonts cohesive across your social media, too? You can upload your custom fonts into Canva, for example, and also my favorite AI-powered tool for putting your social media content on autopilot—OpusClip. It’s an all-in-one social media tool with a built-in content calendar, magical AI video editing, cross-platform scheduling, along with auto-generated captions, descriptions, and hashtags. Pretty unbelievable, right? It has completely transformed my business, and I know it will do the same for yours, too.
And since you’re now on a roll with getting your custom fonts uploaded across all your business tools, you’ll want to make sure your email marketing is also consistent with your branding. Growing your email list is an amazing strategy to consider for your website, too, so you’ll want to make sure your site grabs visitor attention from the start with memorable email forms.
My favorite all-in-one email marketing tool is Flodesk, and since I use them regularly for my brand, I’ve become a trusted affiliate partner. What I love most is how easy it is to upload your brand fonts and colors, along with their amazing library of high-end templates and automations to create eye-catching, on-brand opt-in forms, workflows, and pop-ups. I love them so much that I even wrote this in-depth review about Flodesk, if you want to learn more.
So if you’re a small business, solopreneur, or creator like me, it’s so important to strategically automate as much as possible in your business, so you don’t burn out and can focus your precious time and energy doing the work you do best. If you want to try out Flodesk for FREE and get 25% off your first year, use my affiliate link to get started. Trust me, you will thank me later.
![Burnout Recovery: The Feminine Energy Business Model with Winter Clark [The Sacred Style Podcast-Ep. 9]](https://images.squarespace-cdn.com/content/v1/5fb03822fc8cf9091bebd19a/1777055299226-VKTAUU1E4DC1EDG8IPNK/C-+Episode9-The+Sacred+Style+Podcast-square.png)